Home « Portfolio « Digital Art Tutorials
This tutorial was originally published as an educational blog post with an email list opt-in incentive. The opt-in form has been redacted.
How to Colour Under a Sketch in Photoshop
There are many reasons why you may want to colour under a sketch in Photoshop! Maybe you like the look of sketchy lineart. Perhaps you dislike the process of digitizing lineart, and want to skip it from time to time. Or, maybe you want to mock something up quickly without investing more time than is necessary.
This technique can be especially beneficial for character artists who want to play around with different ideas without investing a lot of time into a piece before finalizing it.
The beauty of digital art is being able to quickly change colours and other aspects of the image without being destructive to the original sketch. This allows for unlimited edits and modifications in a much easier fashion than traditional art would allow!
In this post, I’m going to show you how you can colour under a sketch in Photoshop!
Bonus!
I am making a PSD available for download that demonstrates the way you can set up layers to achieve this look, as a sort of live example.
Please feel free to download it, duplicate it, open it up in Photoshop, poke around, adjust the settings to see what happens… use it as a learning / experimentation tool :)
[opt-in form redacted]
Let’s get started!
Step 1: Import sketch
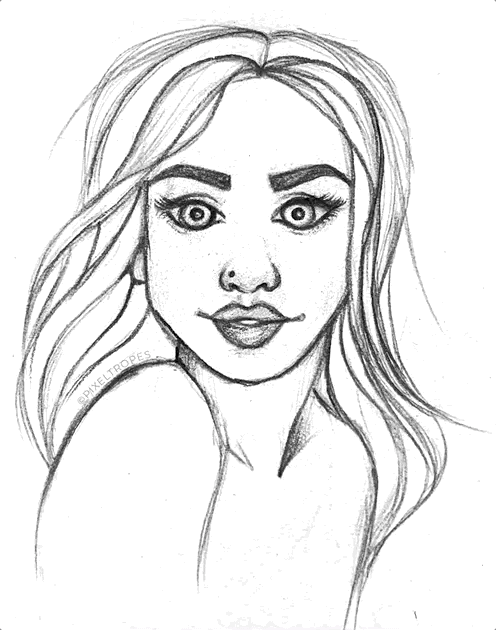
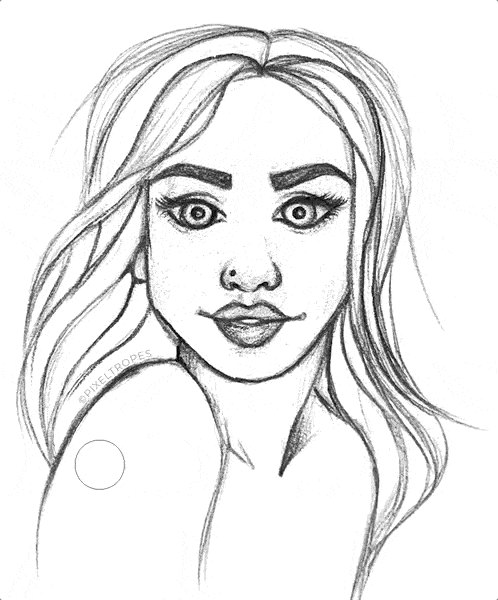
To bring a sketch into Photoshop so as to colour under it, I usually take the easy (lazy?) route of simply taking a photo of it. I honestly find that this is sufficient for my purposes, especially since I adjust the settings and contrast in Photoshop (which I’ll cover later in the tutorial) which makes up for any shortcomings in the photo.
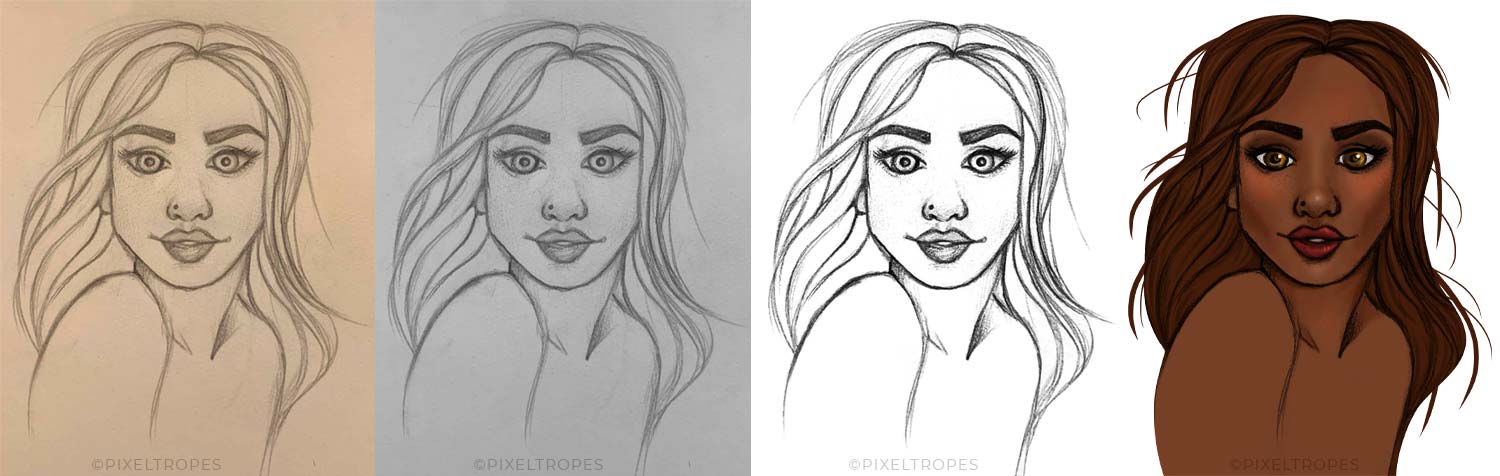
Here’s the picture I took of the sketch I’m going to be using in this tutorial. (This was taken in less-than-ideal lighting and on an iPhone — honestly, it doesn’t need to be perfect!):
Full disclosure: I did make some minor adjustments to this sketch in Photoshop already, primarily to fix up some anatomy mistakes I noticed once it was imported into Photoshop and I was able to manipulate it more easily.
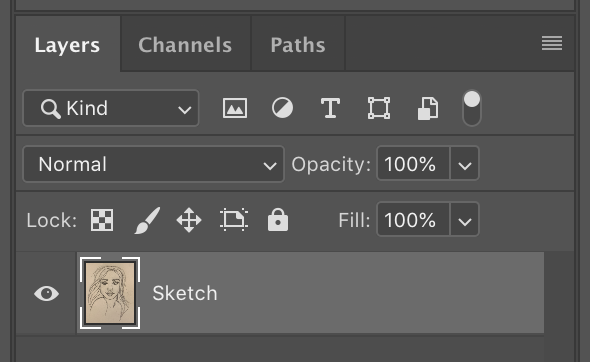
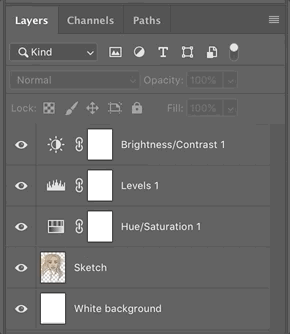
Once you open this in Photoshop, you’ll note that by default, it will put the image on a locked ‘Background’ layer. (Look in the layers panel on the right hand side of the screen).
We want to change this so the layer is editable. To do so, double click on the name “Background” and rename it to “Sketch” (this will also automatically unlock the layer):
Step 1: Add background layer
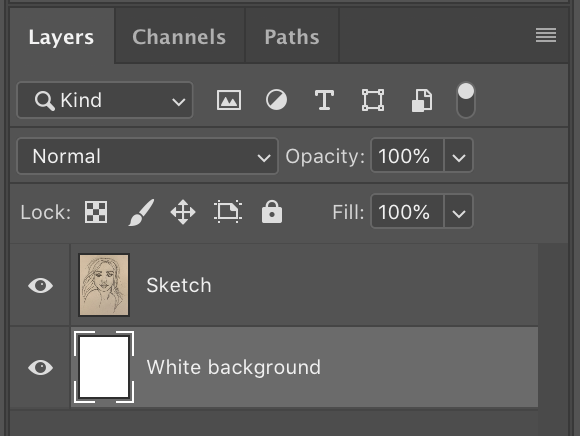
Now let’s create the base white background layer. Click the
![]() icon on the bottom of the layers panel to create a new layer. Double click the default ‘Layer 1’ name and name it
‘White background’ (or whatever makes sense to you).
icon on the bottom of the layers panel to create a new layer. Double click the default ‘Layer 1’ name and name it
‘White background’ (or whatever makes sense to you).
Then we want to select the Paint Bucket tool, which is this icon:
 .
For some Photoshop tools, there are extra ‘nested’ tools that you have to manually select, so if you can’t find that paint
bucket icon in your toolbar, it means that you might have the Gradient tool activated instead (which is by default).
.
For some Photoshop tools, there are extra ‘nested’ tools that you have to manually select, so if you can’t find that paint
bucket icon in your toolbar, it means that you might have the Gradient tool activated instead (which is by default).
To switch it, click & hold the gradient tool icon, then select the paint bucket tool, like this:

After that, click on the front colour square (
 ) and set it to white if it isn’t already. Then, making sure that your ‘White background’ layer is selected (not the ‘Sketch’
layer!), click once on the canvas and it will fill with white.
) and set it to white if it isn’t already. Then, making sure that your ‘White background’ layer is selected (not the ‘Sketch’
layer!), click once on the canvas and it will fill with white.
Drag it underneath your sketch layer so you can see the sketch again. Your layers panel should look something like this now:
Step 3: Add adjustment layers
Next, we want to change the settings of our sketch a little bit. To do this, we will use Adjustment layers.
Select your ‘Sketch’ layer (since that’s the layer we want to adjust), then click this icon at the bottom of the layers panel:
![]()
It is also possible to add the following adjustments to the sketch layer directly without creating extra Adjustment layers,but Adjustment layers are nice because they don’t directly change your sketch layer so you know you can always easily make or revert changes after. They allow for non-destructive changes which it is often a best practice to strive for whenever possible!
Hue/Saturation
In the menu that comes up, start with ‘Hue/Saturation…”, because we want to make the sketch black & white to begin.
In the menu that comes up, simply drag the ‘Saturation’ bar to 0:
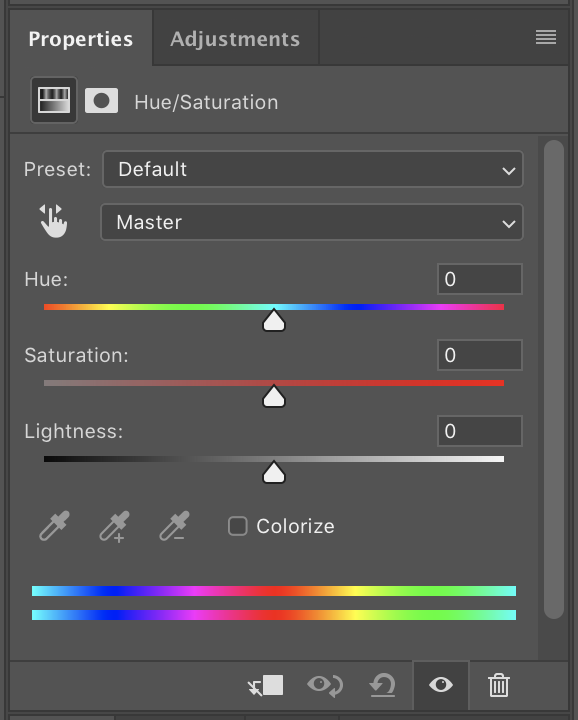
This will remove any colour from your sketch layer, which is what we want! As a result, it’ll look something like this:
Next, select your ‘Sketch’ layer again, then create another Adjustment layer, this time using ‘Levels’. Our objective here is to make the background of the sketch more of a pure white, and the lines to be more of a pure black.
The graph that comes up is a little intimidating, but just experiment with the sliders a bit and you’ll see the effects they have (remember, Command + Z to undo, or Control + Z on windows). Just keep adjusting until the preview looks the way you like.
Note, it will be difficult to get the background completely white without losing too much of the lineart detail, so don’t try to do that. Just get it close-ish.
For your reference, here are the settings I used, and what the effect on the sketch was:
Depending on your initial sketch, you’ll most likely have to adjust those values further, but hopefully that should at least help as a starting point :)
Brightness/Contrast
Another Adjustment layer I find useful to add is ‘Brightness/Contrast’, which will decrease even more of the gray noise around the sketch.
Create the Adjustment layer in the same way and experiment with the settings to see what you like.
I found that setting the Brightness to 4 and the Contrast to 40 worked for me, and here’s the effect it had (demonstrated by hiding & showing the Brightness/Contrast adjustment layer):
If all of these layers are getting a bit confusing, don’t worry! I’ve made a PSD available for download, stripped down to the main layers you need to know about if you’re looking to colour under a sketch, so you can open it directly in Photoshop and see how they are all set up. Download it below! ↓
[opt-in form redacted]
Step 4: Clean up edges
Now, we want to get rid of some of the gray ‘noise’ around the sketch. The steps prior helped decrease this substantially, but it could still use a bit of cleaning.
I personally don’t mind some of it being on her face and hair a little bit, because I think it adds to the sketchy, artsy quality of the piece. However, I especially like the area around the sketch to be clear.
What I do is literally take the eraser brush to the outside of the sketch and simply erase the marks that I don’t want there. Again, it doesn’t have to be perfect! One of the appeals of colouring directly under a sketch is the artistic ‘imperfections’ that come with it.
Select the eraser tool (
 ).
Then, while on your ‘Sketch’ layer, just erase any extraneous gray bits around the edges! Based on what you’re erasing, you may
want to adjust the size & hardness of the eraser brush. (Psst: I have
a whole blog
post dedicated to Photoshop brush settings if that’s something you’d like to, ahem, brush up on… yes, pun
intended. 😝)
).
Then, while on your ‘Sketch’ layer, just erase any extraneous gray bits around the edges! Based on what you’re erasing, you may
want to adjust the size & hardness of the eraser brush. (Psst: I have
a whole blog
post dedicated to Photoshop brush settings if that’s something you’d like to, ahem, brush up on… yes, pun
intended. 😝)
Feel free to make a backup duplicate of your sketch layer first!
You can take this opportunity to clean up any other bits of your sketch, too. Basically, any little marks or anything you don’t want — go ahead and erase them.
Here’s a before and after of my sketch cleanup. You can see it’s fairly subtle, but does make a difference! It’s now ready to be coloured on (or under!)

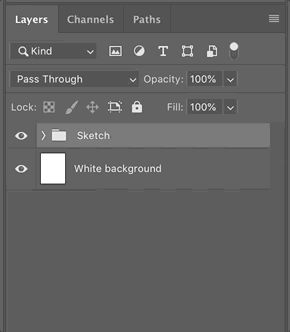
Finally, group your Sketch & Adjustment layers. To do so, simply select them all, then click Command + G (Control + G on Windows). You can then expand and collapse this group as needed, and it helps keep your layers panel from getting too crazy!
Step 5: Set Blending Mode
In order to be able to colour under your sketch without the white parts of it covering it, you need to set the Blending Mode to multiply. This effectively makes the white parts of the sketch transparent so the colour below will show through.
Simply select the Sketch group and then select ‘Multiply’ from the Blending Mode dropdown above.
Step 6: Colour
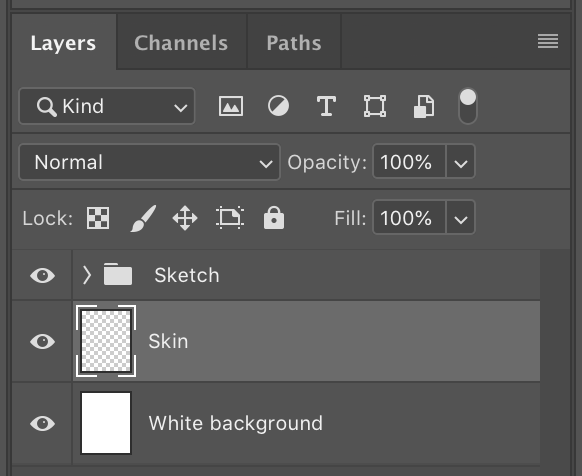
Now, we want to create our first colour layer. Create a new layer and drag it under the Sketch group (I like to create several layers for different colours, and I’m going to start with the base colour of her skin, hence why I named it that).
Your layers panel should look something like this:
Then, just simply start colouring on that layer. So long as you set the Sketch group to Multiply, you’ll be able to see your colour show up underneath!
And, that’s about it! Continue colouring, shading, and so on, as normal, with the Sketch layer on top of your colouring, and it will act like a normal lineart layer.
Here’s what I came up with :) Of course, you can still make adjustments to the sketch layer. Clean up some spots, adjust some details, and so on. It’s not ‘set in stone’ after you’re done the initial editing; you can always make adjustments as you go along!
Remember, I’m making available the PSD of the sketch I used for this tutorial so you can open it up in Photoshop and experiment, see how it’s all set up, and so on. Grab it for free below:
[opt-in form redacted]
I hope you found this tutorial helpful! Please tag me on Instagram and/or Twitter with your creations, or email me — I’d love to see what you come up with.
~ Olivya 🦊
Home « Portfolio « Digital Art Tutorials